# Create, Read and Edit Excel Files in .NET MAUI
## Introduction
*This How-To Guide explains how to create and read Excel files in .NET MAUI apps for Windows using IronXL. Let's get started.*
## IronXL: C# Excel Library
IronXL is a C# .NET library for reading, writing, and manipulating Excel files. It lets users create Excel documents from scratch, including the content and appearance of Excel, as well as metadata such as the title and author. The library also supports customization features for user interface like setting margins, orientation, page size, images and so on. It does not require any external frameworks, platform integration, or other third-party libraries for generating Excel files. It is self-contained and stand-alone.
<div class="hsg-featured-snippet">
<h2>How to Read Excel Files in .NET MAUI</h2>
<ol>
<li><a class="js-modal-open" data-modal-id="trial-license-after-download" href="https://nuget.org/packages/IronXL.Excel/">Install C# library to read Excel file</a></li>
<li>Ensure that all packages required to run MAUI applications are installed</li>
<li>Create Excel files with intuitive APIs in Maui</li>
<li>Load and view Excel files in the browser</li>
<li>Save and export Excel files</li>
</ol>
</div>
## Install IronXL
---------------------------
To install IronXL, you can use the NuGet Package Manager Console in Visual Studio. Open the Console and enter the following command to install the IronXL library.
```shell
:ProductInstall
```
## Creating Excel Files in C# using IronXL
### Design the Application Frontend
Open the XAML page named `MainPage.xaml` and replace the code in it with the following snippet of code.
```xml
<?xml version="1.0" encoding="utf-8" ?>
<ContentPage xmlns="http://schemas.microsoft.com/dotnet/2021/maui"
             xmlns:x="http://schemas.microsoft.com/winfx/2009/xaml"
             x:Class="MAUI_IronXL.MainPage">

    <ScrollView>
        <VerticalStackLayout
            Spacing="25"
            Padding="30,0"
            VerticalOptions="Center">

            <Label
                Text="Welcome to .NET Multi-platform App UI"
                SemanticProperties.HeadingLevel="Level2"
                SemanticProperties.Description="Welcome Multi-platform App UI"
                FontSize="18"
                HorizontalOptions="Center" />

            <Button
                x:Name="createBtn"
                Text="Create Excel File"
                SemanticProperties.Hint="Click on the button to create Excel file"
                Clicked="CreateExcel"
                HorizontalOptions="Center" />

            <Button
                x:Name="readExcel"
                Text="Read and Modify Excel file"
                SemanticProperties.Hint="Click on the button to read Excel file"
                Clicked="ReadExcel"
                HorizontalOptions="Center" />

        </VerticalStackLayout>
    </ScrollView>

</ContentPage>
```
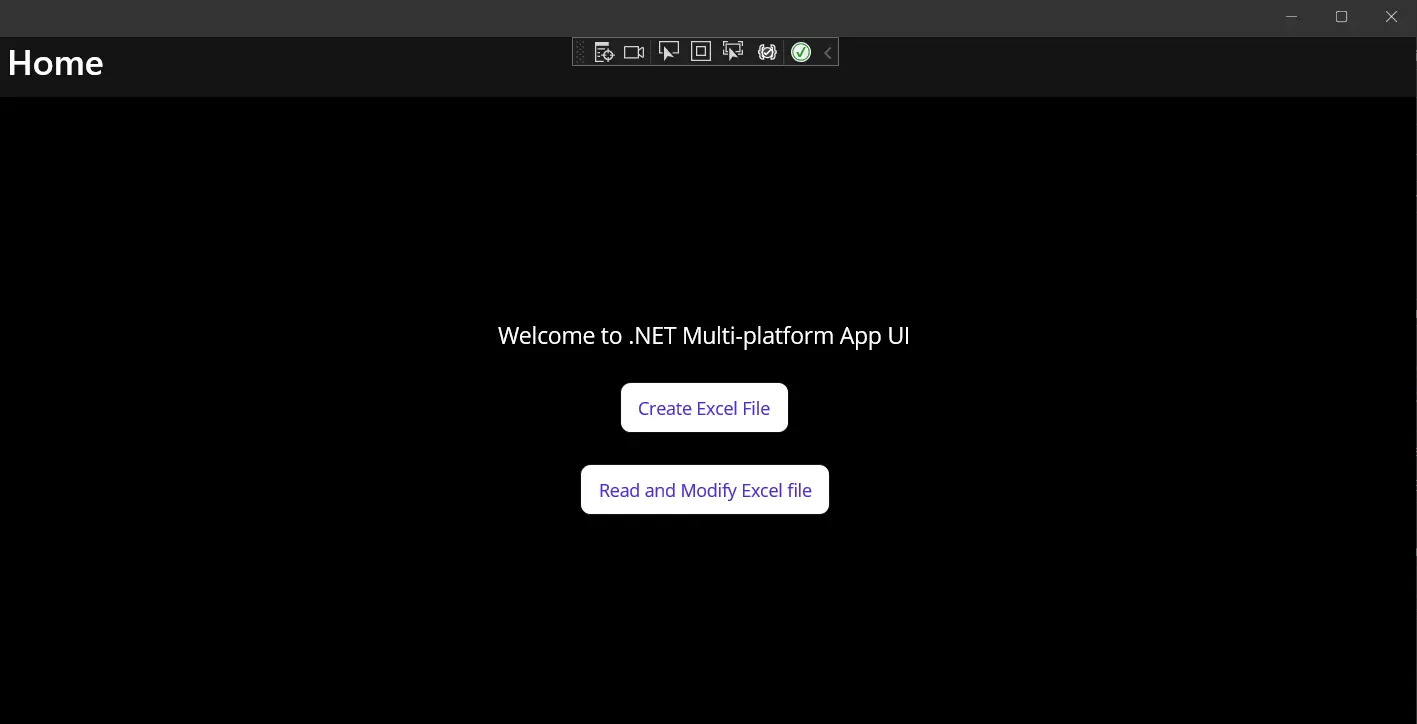
The code above creates the layout for our basic .NET MAUI application. It creates one label and two buttons. One button is for creating an Excel file, and the second button provides support to read and modify the Excel file. Both elements are nested in a VerticalStackLayout parent element so that they will appear vertically aligned on all supported devices.
### Create Excel Files
It's time to create the Excel file using IronXL. Open the `MainPage.xaml.cs` file and write the following method in the file.
```csharp
private void CreateExcel(object sender, EventArgs e)
{
// Create a new Workbook
WorkBook workbook = WorkBook.Create(ExcelFileFormat.XLSX);
// Create a Worksheet
var sheet = workbook.CreateWorkSheet("2022 Budget");
// Set cell headers
sheet["A1"].Value = "January";
sheet["B1"].Value = "February";
sheet["C1"].Value = "March";
sheet["D1"].Value = "April";
sheet["E1"].Value = "May";
sheet["F1"].Value = "June";
sheet["G1"].Value = "July";
sheet["H1"].Value = "August";
// Fill worksheet cells with random values
Random r = new Random();
for (int i = 2; i <= 11; i++)
{
sheet["A" + i].Value = r.Next(1, 1000);
sheet["B" + i].Value = r.Next(1000, 2000);
sheet["C" + i].Value = r.Next(2000, 3000);
sheet["D" + i].Value = r.Next(3000, 4000);
sheet["E" + i].Value = r.Next(4000, 5000);
sheet["F" + i].Value = r.Next(5000, 6000);
sheet["G" + i].Value = r.Next(6000, 7000);
sheet["H" + i].Value = r.Next(7000, 8000);
}
// Apply formatting (background and border)
sheet["A1:H1"].Style.SetBackgroundColor("#d3d3d3");
sheet["A1:H1"].Style.TopBorder.SetColor("#000000");
sheet["A1:H1"].Style.BottomBorder.SetColor("#000000");
sheet["H2:H11"].Style.RightBorder.SetColor("#000000");
sheet["H2:H11"].Style.RightBorder.Type = IronXL.Styles.BorderType.Medium;
sheet["A11:H11"].Style.BottomBorder.SetColor("#000000");
sheet["A11:H11"].Style.BottomBorder.Type = IronXL.Styles.BorderType.Medium;
// Apply formulas
decimal sum = sheet["A2:A11"].Sum();
decimal avg = sheet["B2:B11"].Avg();
decimal max = sheet["C2:C11"].Max();
decimal min = sheet["D2:D11"].Min();
sheet["A12"].Value = "Sum";
sheet["B12"].Value = sum;
sheet["C12"].Value = "Avg";
sheet["D12"].Value = avg;
sheet["E12"].Value = "Max";
sheet["F12"].Value = max;
sheet["G12"].Value = "Min";
sheet["H12"].Value = min;
// Save and open the Excel file
SaveService saveService = new SaveService();
saveService.SaveAndView("Budget.xlsx", "application/octet-stream", workbook.ToStream());
}
```
This source code creates a workbook and worksheet using IronXL, sets cell values, and formats the cells. It also demonstrates how to use Excel formulas with IronXL.
### View Excel Files in the Browser
Open the `MainPage.xaml.cs` file and write the following code.
```csharp
private void ReadExcel(object sender, EventArgs e)
{
// Store the path of the file
string filepath = @"C:\Files\Customer Data.xlsx";
WorkBook workbook = WorkBook.Load(filepath);
WorkSheet sheet = workbook.WorkSheets.First();
// Calculate the sum of a range
decimal sum = sheet["B2:B10"].Sum();
// Modify a cell value and apply styles
sheet["B11"].Value = sum;
sheet["B11"].Style.SetBackgroundColor("#808080");
sheet["B11"].Style.Font.SetColor("#ffffff");
// Save and open the Excel file
SaveService saveService = new SaveService();
saveService.SaveAndView("Modified Data.xlsx", "application/octet-stream", workbook.ToStream());
DisplayAlert("Notification", "Excel file has been modified!", "OK");
}
```
The source code loads the Excel file, applies a formula on a range of cells, and formats it with custom background and text coloring. Afterwards, the modified Excel file is saved and a notification is displayed.
### Save Excel Files
In this section, we define the `SaveService` class that will save our Excel files in local storage.
Create a "SaveService.cs" class and write the following code:
```csharp
using System;
using System.IO;
namespace MAUI_IronXL
{
public partial class SaveService
{
public partial void SaveAndView(string fileName, string contentType, MemoryStream stream);
}
}
```
Next, create a class named "SaveWindows.cs" inside the Platforms > Windows folder, and add the following code:
```csharp
using System;
using System.Collections.Generic;
using System.IO;
using System.Runtime.InteropServices.WindowsRuntime;
using Windows.Storage;
using Windows.Storage.Pickers;
using Windows.Storage.Streams;
using Windows.UI.Popups;
namespace MAUI_IronXL
{
public partial class SaveService
{
public async partial void SaveAndView(string fileName, string contentType, MemoryStream stream)
{
StorageFile stFile;
string extension = Path.GetExtension(fileName);
IntPtr windowHandle = System.Diagnostics.Process.GetCurrentProcess().MainWindowHandle;
if (!Windows.Foundation.Metadata.ApiInformation.IsTypePresent("Windows.Phone.UI.Input.HardwareButtons"))
{
FileSavePicker savePicker = new FileSavePicker();
savePicker.DefaultFileExtension = ".xlsx";
savePicker.SuggestedFileName = fileName;
savePicker.FileTypeChoices.Add("XLSX", new List<string> { ".xlsx" });
WinRT.Interop.InitializeWithWindow.Initialize(savePicker, windowHandle);
stFile = await savePicker.PickSaveFileAsync();
}
else
{
StorageFolder local = ApplicationData.Current.LocalFolder;
stFile = await local.CreateFileAsync(fileName, CreationCollisionOption.ReplaceExisting);
}
if (stFile != null)
{
using (IRandomAccessStream zipStream = await stFile.OpenAsync(FileAccessMode.ReadWrite))
{
using (Stream outputStream = zipStream.AsStreamForWrite())
{
outputStream.SetLength(0);
stream.WriteTo(outputStream);
await outputStream.FlushAsync();
}
}
MessageDialog msgDialog = new("Do you want to view the document?", "File has been created successfully");
UICommand yesCmd = new("Yes");
msgDialog.Commands.Add(yesCmd);
UICommand noCmd = new("No");
msgDialog.Commands.Add(noCmd);
WinRT.Interop.InitializeWithWindow.Initialize(msgDialog, windowHandle);
IUICommand cmd = await msgDialog.ShowAsync();
if (cmd.Label == yesCmd.Label)
{
await Windows.System.Launcher.LaunchFileAsync(stFile);
}
}
}
}
}
```
### Output
Build and run the MAUI project. On successful execution, a window will open showing the content depicted in the image below.
<div class="content-img-align-center">
<div class="center-image-wrapper">
<img src="/img/tutorials/read-create-excel-net-maui/read-create-excel-net-maui-1.webp" alt="Read, Create, and Edit Excel Files in .NET MAUI, Figure 1: Output" class="img-responsive add-shadow" />
<p><strong>Figure 1</strong> - <em>Output</em></p>
</div>
</div>
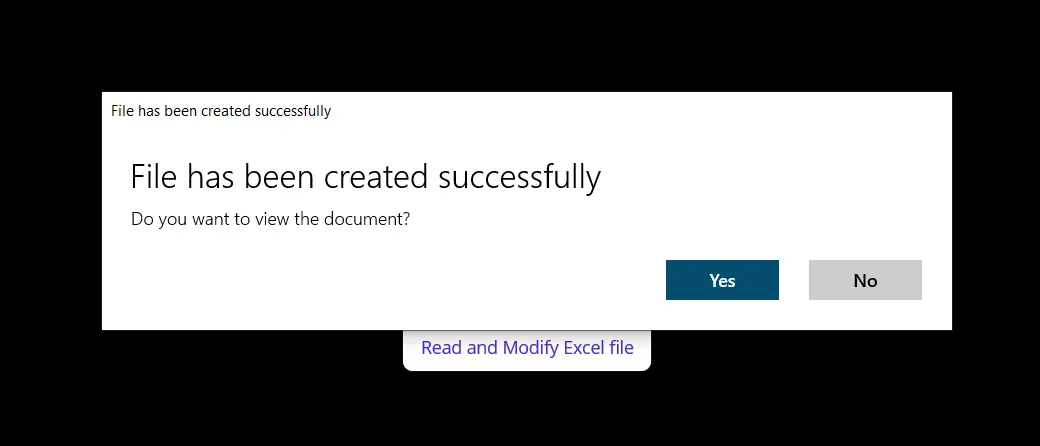
Clicking on the "Create Excel File" button will open a separate dialog window. This window prompts users to choose a location and a filename by which to save a new (generated) Excel file. Specify the location and filename as directed, and click OK. Afterward, another dialog window will appear.
<div class="content-img-align-center">
<div class="center-image-wrapper">
<img src="/img/tutorials/read-create-excel-net-maui/read-create-excel-net-maui-2.webp" alt="Read, Create, and Edit Excel Files in .NET MAUI, Figure 2: Create Excel Popup" class="img-responsive add-shadow" />
<p><strong>Figure 2</strong> - <em>Create Excel Popup</em></p>
</div>
</div>
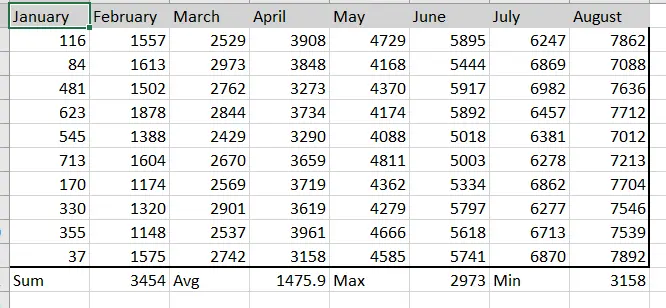
Opening the Excel file as directed in the popup will bring up a document as shown in the screenshot below.
<div class="content-img-align-center">
<div class="center-image-wrapper">
<img src="/img/tutorials/read-create-excel-net-maui/read-create-excel-net-maui-3.webp" alt="Read, Create, and Edit Excel Files in .NET MAUI, Figure 3: Output" class="img-responsive add-shadow" />
<p><strong>Figure 3</strong> - <em>Read and Modify Excel Popup</em></p>
</div>
</div>
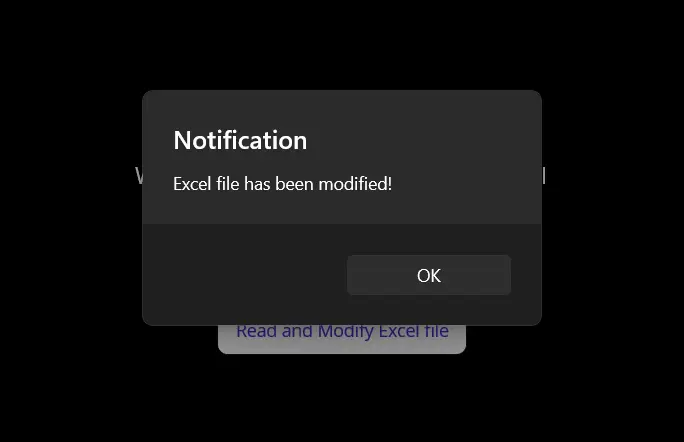
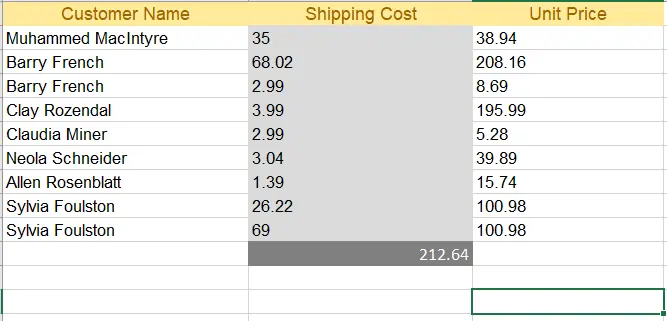
Clicking on the "Read and Modify Excel File" button will load the previously generated Excel file and modify it with the custom background and text colors that we defined in an earlier section.
<div class="content-img-align-center">
<div class="center-image-wrapper">
<img src="/img/tutorials/read-create-excel-net-maui/read-create-excel-net-maui-4.webp" alt="Read, Create, and Edit Excel Files in .NET MAUI, Figure 4: Excel Output" class="img-responsive add-shadow" />
<p><strong>Figure 4</strong> - <em>Excel Output</em></p>
</div>
</div>
When you open the modified file, you'll see the following output with table of contents.
<div class="content-img-align-center">
<div class="center-image-wrapper">
<img src="/img/tutorials/read-create-excel-net-maui/read-create-excel-net-maui-5.webp" alt="Read, Create, and Edit Excel Files in .NET MAUI, Figure 5: Modified Excel Output" class="img-responsive add-shadow" />
<p><strong>Figure 5</strong> - <em>Modified Excel Output</em></p>
</div>
</div>
## Conclusion
This explained how we can create, read and modify Excel files in the .NET MAUI application using the IronXL library. IronXL performs very well and does all operations with speed and accuracy. It is an excellent library for Excel operations, outperforming Microsoft Interop, as it doesn't require any installation of the Microsoft Office Suite on the machine. In addition, IronXL supports multiple operations like creating workbooks and worksheets, working with cell ranges, formatting, and exporting to various document types like CSV, TSV, and more.
IronXL supports all project templates like Windows Form, WPF, ASP.NET Core, and many others. Refer to our tutorials for [creating Excel files](/csharp/excel/tutorials/create-excel-file-net/) and [reading Excel files](/csharp/excel/tutorials/how-to-read-excel-file-csharp/) for additional information about how to use IronXL.
<hr class="separator" />
<h4 class="tutorial-segment-title">Quick Access Links</h4>
<div class="tutorial-section">
<div class="row">
<div class="col-sm-8">
<h3>Explore this How-To Guide on GitHub</h3>
<p>The source code for this project is available on GitHub.</p>
<p>Use this code as an easy way to get up and running in just a few minutes. The project is saved as a Microsoft Visual Studio 2022 project, but is compatible with any .NET IDE.</p>
<a class="doc-link" href="https://github.com/tayyab-create/MAUI-Create-and-Read-Excel-using-IronXL" target="_blank">How to Read, Create, and Edit Excel Files in .NET MAUI Apps<i class="fa fa-chevron-right"></i></a>
</div>
<div class="col-sm-4">
<div class="tutorial-image">
<img alt="" class="img-responsive add-shadow" src="/img/svgs/github-icon.svg" />
</div>
</div>
</div>
</div>
<div class="tutorial-section">
<div class="row">
<div class="col-sm-4">
<div class="tutorial-image">
<img style="max-width: 110px; width: 100px; height: 140px;" alt="" class="img-responsive add-shadow" src="/img/svgs/documentation.svg" width="100" height="140" />
</div>
</div>
<div class="col-sm-8">
<h3>View the API Reference</h3>
<p>Explore the API Reference for IronXL, outlining the details of all of IronXL's features, namespaces, classes, methods, fields, and enums.</p>
<a class="doc-link" href="https://ironsoftware.com/csharp/excel/object-reference/api/" target="_blank">View the API Reference <i class="fa fa-chevron-right"></i></a>
</div>
</div>
</div>
This How-To Guide explains how to create and read Excel files in .NET MAUI apps for Windows using IronXL. Let's get started.
IronXL: C# Excel Library
IronXL is a C# .NET library for reading, writing, and manipulating Excel files. It lets users create Excel documents from scratch, including the content and appearance of Excel, as well as metadata such as the title and author. The library also supports customization features for user interface like setting margins, orientation, page size, images and so on. It does not require any external frameworks, platform integration, or other third-party libraries for generating Excel files. It is self-contained and stand-alone.
Ensure that all packages required to run MAUI applications are installed
Create Excel files with intuitive APIs in Maui
Load and view Excel files in the browser
Save and export Excel files
Install IronXL
To install IronXL, you can use the NuGet Package Manager Console in Visual Studio. Open the Console and enter the following command to install the IronXL library.
PM > Install-Package IronXL.Excel
Install-Package IronXL.Excel
Creating Excel Files in C# using IronXL
Design the Application Frontend
Open the XAML page named MainPage.xaml and replace the code in it with the following snippet of code.
<?xml version="1.0" encoding="utf-8" ?><ContentPage xmlns="http://schemas.microsoft.com/dotnet/2021/maui" xmlns:x="http://schemas.microsoft.com/winfx/2009/xaml" x:Class="MAUI_IronXL.MainPage"> <ScrollView> <VerticalStackLayout Spacing="25" Padding="30,0" VerticalOptions="Center"> <Label Text="Welcome to .NET Multi-platform App UI" SemanticProperties.HeadingLevel="Level2" SemanticProperties.Description="Welcome Multi-platform App UI" FontSize="18" HorizontalOptions="Center" /> <Button x:Name="createBtn" Text="Create Excel File" SemanticProperties.Hint="Click on the button to create Excel file" Clicked="CreateExcel" HorizontalOptions="Center" /> <Button x:Name="readExcel" Text="Read and Modify Excel file" SemanticProperties.Hint="Click on the button to read Excel file" Clicked="ReadExcel" HorizontalOptions="Center" /> </VerticalStackLayout> </ScrollView></ContentPage>
<?xml version="1.0" encoding="utf-8" ?>
<ContentPage xmlns="http://schemas.microsoft.com/dotnet/2021/maui"
             xmlns:x="http://schemas.microsoft.com/winfx/2009/xaml"
             x:Class="MAUI_IronXL.MainPage">

    <ScrollView>
        <VerticalStackLayout
            Spacing="25"
            Padding="30,0"
            VerticalOptions="Center">

            <Label
                Text="Welcome to .NET Multi-platform App UI"
                SemanticProperties.HeadingLevel="Level2"
                SemanticProperties.Description="Welcome Multi-platform App UI"
                FontSize="18"
                HorizontalOptions="Center" />

            <Button
                x:Name="createBtn"
                Text="Create Excel File"
                SemanticProperties.Hint="Click on the button to create Excel file"
                Clicked="CreateExcel"
                HorizontalOptions="Center" />

            <Button
                x:Name="readExcel"
                Text="Read and Modify Excel file"
                SemanticProperties.Hint="Click on the button to read Excel file"
                Clicked="ReadExcel"
                HorizontalOptions="Center" />

        </VerticalStackLayout>
    </ScrollView>

</ContentPage>
XML
The code above creates the layout for our basic .NET MAUI application. It creates one label and two buttons. One button is for creating an Excel file, and the second button provides support to read and modify the Excel file. Both elements are nested in a VerticalStackLayout parent element so that they will appear vertically aligned on all supported devices.
Create Excel Files
It's time to create the Excel file using IronXL. Open the MainPage.xaml.cs file and write the following method in the file.
private voidCreateExcel(object sender, EventArgs e){ // Create a new Workbook WorkBook workbook = WorkBook.Create(ExcelFileFormat.XLSX); // Create a Worksheet var sheet = workbook.CreateWorkSheet("2022 Budget"); // Set cell headers sheet["A1"].Value = "January"; sheet["B1"].Value = "February"; sheet["C1"].Value = "March"; sheet["D1"].Value = "April"; sheet["E1"].Value = "May"; sheet["F1"].Value = "June"; sheet["G1"].Value = "July"; sheet["H1"].Value = "August"; // Fill worksheet cells with random values Random r = new Random(); for (int i = 2; i <= 11; i++) { sheet["A" + i].Value = r.Next(1, 1000); sheet["B" + i].Value = r.Next(1000, 2000); sheet["C" + i].Value = r.Next(2000, 3000); sheet["D" + i].Value = r.Next(3000, 4000); sheet["E" + i].Value = r.Next(4000, 5000); sheet["F" + i].Value = r.Next(5000, 6000); sheet["G" + i].Value = r.Next(6000, 7000); sheet["H" + i].Value = r.Next(7000, 8000); } // Apply formatting (background and border) sheet["A1:H1"].Style.SetBackgroundColor("#d3d3d3"); sheet["A1:H1"].Style.TopBorder.SetColor("#000000"); sheet["A1:H1"].Style.BottomBorder.SetColor("#000000"); sheet["H2:H11"].Style.RightBorder.SetColor("#000000"); sheet["H2:H11"].Style.RightBorder.Type = IronXL.Styles.BorderType.Medium; sheet["A11:H11"].Style.BottomBorder.SetColor("#000000"); sheet["A11:H11"].Style.BottomBorder.Type = IronXL.Styles.BorderType.Medium; // Apply formulas decimal sum = sheet["A2:A11"].Sum(); decimal avg = sheet["B2:B11"].Avg(); decimal max = sheet["C2:C11"].Max(); decimal min = sheet["D2:D11"].Min(); sheet["A12"].Value = "Sum"; sheet["B12"].Value = sum; sheet["C12"].Value = "Avg"; sheet["D12"].Value = avg; sheet["E12"].Value = "Max"; sheet["F12"].Value = max; sheet["G12"].Value = "Min"; sheet["H12"].Value = min; // Save and open the Excel file SaveService saveService = new SaveService(); saveService.SaveAndView("Budget.xlsx", "application/octet-stream", workbook.ToStream());}
private void CreateExcel(object sender, EventArgs e)
{
    // Create a new Workbook
    WorkBook workbook = WorkBook.Create(ExcelFileFormat.XLSX);

    // Create a Worksheet
    var sheet = workbook.CreateWorkSheet("2022 Budget");

    // Set cell headers
    sheet["A1"].Value = "January";
    sheet["B1"].Value = "February";
    sheet["C1"].Value = "March";
    sheet["D1"].Value = "April";
    sheet["E1"].Value = "May";
    sheet["F1"].Value = "June";
    sheet["G1"].Value = "July";
    sheet["H1"].Value = "August";

    // Fill worksheet cells with random values
    Random r = new Random();
    for (int i = 2; i <= 11; i++)
    {
        sheet["A" + i].Value = r.Next(1, 1000);
        sheet["B" + i].Value = r.Next(1000, 2000);
        sheet["C" + i].Value = r.Next(2000, 3000);
        sheet["D" + i].Value = r.Next(3000, 4000);
        sheet["E" + i].Value = r.Next(4000, 5000);
        sheet["F" + i].Value = r.Next(5000, 6000);
        sheet["G" + i].Value = r.Next(6000, 7000);
        sheet["H" + i].Value = r.Next(7000, 8000);
    }

    // Apply formatting (background and border)
    sheet["A1:H1"].Style.SetBackgroundColor("#d3d3d3");
    sheet["A1:H1"].Style.TopBorder.SetColor("#000000");
    sheet["A1:H1"].Style.BottomBorder.SetColor("#000000");
    sheet["H2:H11"].Style.RightBorder.SetColor("#000000");
    sheet["H2:H11"].Style.RightBorder.Type = IronXL.Styles.BorderType.Medium;
    sheet["A11:H11"].Style.BottomBorder.SetColor("#000000");
    sheet["A11:H11"].Style.BottomBorder.Type = IronXL.Styles.BorderType.Medium;

    // Apply formulas
    decimal sum = sheet["A2:A11"].Sum();
    decimal avg = sheet["B2:B11"].Avg();
    decimal max = sheet["C2:C11"].Max();
    decimal min = sheet["D2:D11"].Min();

    sheet["A12"].Value = "Sum";
    sheet["B12"].Value = sum;

    sheet["C12"].Value = "Avg";
    sheet["D12"].Value = avg;

    sheet["E12"].Value = "Max";
    sheet["F12"].Value = max;

    sheet["G12"].Value = "Min";
    sheet["H12"].Value = min;

    // Save and open the Excel file
    SaveService saveService = new SaveService();
    saveService.SaveAndView("Budget.xlsx", "application/octet-stream", workbook.ToStream());
}
Private Sub CreateExcel(ByVal sender AsObject, ByVal e AsEventArgs) ' Create a new Workbook Dim workbook AsWorkBook = WorkBook.Create(ExcelFileFormat.XLSX) ' Create a Worksheet Dim sheet = workbook.CreateWorkSheet("2022 Budget") ' Set cell headers sheet("A1").Value = "January" sheet("B1").Value = "February" sheet("C1").Value = "March" sheet("D1").Value = "April" sheet("E1").Value = "May" sheet("F1").Value = "June" sheet("G1").Value = "July" sheet("H1").Value = "August" ' Fill worksheet cells with random values Dim r As New Random() For i AsInteger = 2 To 11 sheet("A" & i).Value = r.Next(1, 1000) sheet("B" & i).Value = r.Next(1000, 2000) sheet("C" & i).Value = r.Next(2000, 3000) sheet("D" & i).Value = r.Next(3000, 4000) sheet("E" & i).Value = r.Next(4000, 5000) sheet("F" & i).Value = r.Next(5000, 6000) sheet("G" & i).Value = r.Next(6000, 7000) sheet("H" & i).Value = r.Next(7000, 8000) Next i ' Apply formatting (background and border) sheet("A1:H1").Style.SetBackgroundColor("#d3d3d3") sheet("A1:H1").Style.TopBorder.SetColor("#000000") sheet("A1:H1").Style.BottomBorder.SetColor("#000000") sheet("H2:H11").Style.RightBorder.SetColor("#000000") sheet("H2:H11").Style.RightBorder.Type = IronXL.Styles.BorderType.Medium sheet("A11:H11").Style.BottomBorder.SetColor("#000000") sheet("A11:H11").Style.BottomBorder.Type = IronXL.Styles.BorderType.Medium ' Apply formulas Dim sum AsDecimal = sheet("A2:A11").Sum() Dim avg AsDecimal = sheet("B2:B11").Avg() Dim max AsDecimal = sheet("C2:C11").Max() Dim min AsDecimal = sheet("D2:D11").Min() sheet("A12").Value = "Sum" sheet("B12").Value = sum sheet("C12").Value = "Avg" sheet("D12").Value = avg sheet("E12").Value = "Max" sheet("F12").Value = max sheet("G12").Value = "Min" sheet("H12").Value = min ' Save and open the Excel file Dim saveService As New SaveService() saveService.SaveAndView("Budget.xlsx", "application/octet-stream", workbook.ToStream())End Sub
Private Sub CreateExcel(ByVal sender As Object, ByVal e As EventArgs)
	' Create a new Workbook
	Dim workbook As WorkBook = WorkBook.Create(ExcelFileFormat.XLSX)

	' Create a Worksheet
	Dim sheet = workbook.CreateWorkSheet("2022 Budget")

	' Set cell headers
	sheet("A1").Value = "January"
	sheet("B1").Value = "February"
	sheet("C1").Value = "March"
	sheet("D1").Value = "April"
	sheet("E1").Value = "May"
	sheet("F1").Value = "June"
	sheet("G1").Value = "July"
	sheet("H1").Value = "August"

	' Fill worksheet cells with random values
	Dim r As New Random()
	For i As Integer = 2 To 11
		sheet("A" & i).Value = r.Next(1, 1000)
		sheet("B" & i).Value = r.Next(1000, 2000)
		sheet("C" & i).Value = r.Next(2000, 3000)
		sheet("D" & i).Value = r.Next(3000, 4000)
		sheet("E" & i).Value = r.Next(4000, 5000)
		sheet("F" & i).Value = r.Next(5000, 6000)
		sheet("G" & i).Value = r.Next(6000, 7000)
		sheet("H" & i).Value = r.Next(7000, 8000)
	Next i

	' Apply formatting (background and border)
	sheet("A1:H1").Style.SetBackgroundColor("#d3d3d3")
	sheet("A1:H1").Style.TopBorder.SetColor("#000000")
	sheet("A1:H1").Style.BottomBorder.SetColor("#000000")
	sheet("H2:H11").Style.RightBorder.SetColor("#000000")
	sheet("H2:H11").Style.RightBorder.Type = IronXL.Styles.BorderType.Medium
	sheet("A11:H11").Style.BottomBorder.SetColor("#000000")
	sheet("A11:H11").Style.BottomBorder.Type = IronXL.Styles.BorderType.Medium

	' Apply formulas
	Dim sum As Decimal = sheet("A2:A11").Sum()
	Dim avg As Decimal = sheet("B2:B11").Avg()
	Dim max As Decimal = sheet("C2:C11").Max()
	Dim min As Decimal = sheet("D2:D11").Min()

	sheet("A12").Value = "Sum"
	sheet("B12").Value = sum

	sheet("C12").Value = "Avg"
	sheet("D12").Value = avg

	sheet("E12").Value = "Max"
	sheet("F12").Value = max

	sheet("G12").Value = "Min"
	sheet("H12").Value = min

	' Save and open the Excel file
	Dim saveService As New SaveService()
	saveService.SaveAndView("Budget.xlsx", "application/octet-stream", workbook.ToStream())
End Sub
This source code creates a workbook and worksheet using IronXL, sets cell values, and formats the cells. It also demonstrates how to use Excel formulas with IronXL.
View Excel Files in the Browser
Open the MainPage.xaml.cs file and write the following code.
private voidReadExcel(object sender, EventArgs e){ // Store the path of the file string filepath = @"C:\Files\Customer Data.xlsx"; WorkBook workbook = WorkBook.Load(filepath); WorkSheet sheet = workbook.WorkSheets.First(); // Calculate the sum of a range decimal sum = sheet["B2:B10"].Sum(); // Modify a cell value and apply styles sheet["B11"].Value = sum; sheet["B11"].Style.SetBackgroundColor("#808080"); sheet["B11"].Style.Font.SetColor("#ffffff"); // Save and open the Excel file SaveService saveService = new SaveService(); saveService.SaveAndView("Modified Data.xlsx", "application/octet-stream", workbook.ToStream());DisplayAlert("Notification", "Excel file has been modified!", "OK");}
private void ReadExcel(object sender, EventArgs e)
{
    // Store the path of the file
    string filepath = @"C:\Files\Customer Data.xlsx";
    WorkBook workbook = WorkBook.Load(filepath);
    WorkSheet sheet = workbook.WorkSheets.First();

    // Calculate the sum of a range
    decimal sum = sheet["B2:B10"].Sum();

    // Modify a cell value and apply styles
    sheet["B11"].Value = sum;
    sheet["B11"].Style.SetBackgroundColor("#808080");
    sheet["B11"].Style.Font.SetColor("#ffffff");

    // Save and open the Excel file
    SaveService saveService = new SaveService();
    saveService.SaveAndView("Modified Data.xlsx", "application/octet-stream", workbook.ToStream());

    DisplayAlert("Notification", "Excel file has been modified!", "OK");
}
Private Sub ReadExcel(ByVal sender AsObject, ByVal e AsEventArgs) ' Store the path of the file Dim filepath AsString = "C:\Files\Customer Data.xlsx" Dim workbook AsWorkBook = WorkBook.Load(filepath) Dim sheet AsWorkSheet = workbook.WorkSheets.First() ' Calculate the sum of a range Dim sum AsDecimal = sheet("B2:B10").Sum() ' Modify a cell value and apply styles sheet("B11").Value = sum sheet("B11").Style.SetBackgroundColor("#808080") sheet("B11").Style.Font.SetColor("#ffffff") ' Save and open the Excel file Dim saveService As New SaveService() saveService.SaveAndView("Modified Data.xlsx", "application/octet-stream", workbook.ToStream())DisplayAlert("Notification", "Excel file has been modified!", "OK")End Sub
Private Sub ReadExcel(ByVal sender As Object, ByVal e As EventArgs)
	' Store the path of the file
	Dim filepath As String = "C:\Files\Customer Data.xlsx"
	Dim workbook As WorkBook = WorkBook.Load(filepath)
	Dim sheet As WorkSheet = workbook.WorkSheets.First()

	' Calculate the sum of a range
	Dim sum As Decimal = sheet("B2:B10").Sum()

	' Modify a cell value and apply styles
	sheet("B11").Value = sum
	sheet("B11").Style.SetBackgroundColor("#808080")
	sheet("B11").Style.Font.SetColor("#ffffff")

	' Save and open the Excel file
	Dim saveService As New SaveService()
	saveService.SaveAndView("Modified Data.xlsx", "application/octet-stream", workbook.ToStream())

	DisplayAlert("Notification", "Excel file has been modified!", "OK")
End Sub
The source code loads the Excel file, applies a formula on a range of cells, and formats it with custom background and text coloring. Afterwards, the modified Excel file is saved and a notification is displayed.
Save Excel Files
In this section, we define the SaveService class that will save our Excel files in local storage.
Create a "SaveService.cs" class and write the following code:
using System;using System.IO;namespace MAUI_IronXL{ public partial class SaveService { public partial voidSaveAndView(string fileName, string contentType, MemoryStream stream); }}
using System;
using System.IO;

namespace MAUI_IronXL
{
    public partial class SaveService
    {
        public partial void SaveAndView(string fileName, string contentType, MemoryStream stream);
    }
}
ImportsSystemImportsSystem.IONamespaceMAUI_IronXLPartialPublic Class SaveService PublicPartial Private Sub SaveAndView(ByVal fileName AsString, ByVal contentType AsString, ByVal stream AsMemoryStream) End Sub End ClassEndNamespace
Imports System
Imports System.IO

Namespace MAUI_IronXL
	Partial Public Class SaveService
		Public Partial Private Sub SaveAndView(ByVal fileName As String, ByVal contentType As String, ByVal stream As MemoryStream)
		End Sub
	End Class
End Namespace
Next, create a class named "SaveWindows.cs" inside the Platforms > Windows folder, and add the following code:
using System;using System.Collections.Generic;using System.IO;using System.Runtime.InteropServices.WindowsRuntime;using Windows.Storage;using Windows.Storage.Pickers;using Windows.Storage.Streams;using Windows.UI.Popups;namespace MAUI_IronXL{ public partial class SaveService { public async partial voidSaveAndView(string fileName, string contentType, MemoryStream stream) { StorageFile stFile; string extension = Path.GetExtension(fileName); IntPtr windowHandle = System.Diagnostics.Process.GetCurrentProcess().MainWindowHandle; if (!Windows.Foundation.Metadata.ApiInformation.IsTypePresent("Windows.Phone.UI.Input.HardwareButtons")) { FileSavePicker savePicker = new FileSavePicker(); savePicker.DefaultFileExtension = ".xlsx"; savePicker.SuggestedFileName = fileName; savePicker.FileTypeChoices.Add("XLSX", new List<string> { ".xlsx" });WinRT.Interop.InitializeWithWindow.Initialize(savePicker, windowHandle); stFile = await savePicker.PickSaveFileAsync(); } else { StorageFolder local = ApplicationData.Current.LocalFolder; stFile = await local.CreateFileAsync(fileName, CreationCollisionOption.ReplaceExisting); } if (stFile != null) { using (IRandomAccessStream zipStream = await stFile.OpenAsync(FileAccessMode.ReadWrite)) { using (Stream outputStream = zipStream.AsStreamForWrite()) { outputStream.SetLength(0); stream.WriteTo(outputStream); await outputStream.FlushAsync(); } } MessageDialog msgDialog = new("Do you want to view the document?", "File has been created successfully"); UICommand yesCmd = new("Yes"); msgDialog.Commands.Add(yesCmd); UICommand noCmd = new("No"); msgDialog.Commands.Add(noCmd);WinRT.Interop.InitializeWithWindow.Initialize(msgDialog, windowHandle); IUICommand cmd = await msgDialog.ShowAsync(); if (cmd.Label == yesCmd.Label) { awaitWindows.System.Launcher.LaunchFileAsync(stFile); } } } }}
using System;
using System.Collections.Generic;
using System.IO;
using System.Runtime.InteropServices.WindowsRuntime;
using Windows.Storage;
using Windows.Storage.Pickers;
using Windows.Storage.Streams;
using Windows.UI.Popups;

namespace MAUI_IronXL
{
    public partial class SaveService
    {
        public async partial void SaveAndView(string fileName, string contentType, MemoryStream stream)
        {
            StorageFile stFile;
            string extension = Path.GetExtension(fileName);
            IntPtr windowHandle = System.Diagnostics.Process.GetCurrentProcess().MainWindowHandle;

            if (!Windows.Foundation.Metadata.ApiInformation.IsTypePresent("Windows.Phone.UI.Input.HardwareButtons"))
            {
                FileSavePicker savePicker = new FileSavePicker();
                savePicker.DefaultFileExtension = ".xlsx";
                savePicker.SuggestedFileName = fileName;
                savePicker.FileTypeChoices.Add("XLSX", new List<string> { ".xlsx" });

                WinRT.Interop.InitializeWithWindow.Initialize(savePicker, windowHandle);
                stFile = await savePicker.PickSaveFileAsync();
            }
            else
            {
                StorageFolder local = ApplicationData.Current.LocalFolder;
                stFile = await local.CreateFileAsync(fileName, CreationCollisionOption.ReplaceExisting);
            }

            if (stFile != null)
            {
                using (IRandomAccessStream zipStream = await stFile.OpenAsync(FileAccessMode.ReadWrite))
                {
                    using (Stream outputStream = zipStream.AsStreamForWrite())
                    {
                        outputStream.SetLength(0);
                        stream.WriteTo(outputStream);
                        await outputStream.FlushAsync();
                    }
                }

                MessageDialog msgDialog = new("Do you want to view the document?", "File has been created successfully");
                UICommand yesCmd = new("Yes");
                msgDialog.Commands.Add(yesCmd);
                UICommand noCmd = new("No");
                msgDialog.Commands.Add(noCmd);

                WinRT.Interop.InitializeWithWindow.Initialize(msgDialog, windowHandle);

                IUICommand cmd = await msgDialog.ShowAsync();
                if (cmd.Label == yesCmd.Label)
                {
                    await Windows.System.Launcher.LaunchFileAsync(stFile);
                }
            }
        }
    }
}
ImportsSystemImportsSystem.Collections.GenericImportsSystem.IOImportsSystem.Runtime.InteropServices.WindowsRuntimeImportsWindows.StorageImportsWindows.Storage.PickersImportsWindows.Storage.StreamsImportsWindows.UI.PopupsNamespaceMAUI_IronXLPartialPublic Class SaveService PublicAsync Sub SaveAndView(ByVal fileName AsString, ByVal contentType AsString, ByVal stream AsMemoryStream) Dim stFile AsStorageFile Dim extension AsString = Path.GetExtension(fileName) Dim windowHandle AsIntPtr = System.Diagnostics.Process.GetCurrentProcess().MainWindowHandle IfNotWindows.Foundation.Metadata.ApiInformation.IsTypePresent("Windows.Phone.UI.Input.HardwareButtons") Then Dim savePicker As New FileSavePicker() savePicker.DefaultFileExtension = ".xlsx" savePicker.SuggestedFileName = fileName savePicker.FileTypeChoices.Add("XLSX", New List(OfString) From {".xlsx"})WinRT.Interop.InitializeWithWindow.Initialize(savePicker, windowHandle) stFile = Await savePicker.PickSaveFileAsync() Else Dim local AsStorageFolder = ApplicationData.Current.LocalFolder stFile = Await local.CreateFileAsync(fileName, CreationCollisionOption.ReplaceExisting) End If If stFile IsNot Nothing ThenUsing zipStream AsIRandomAccessStream = Await stFile.OpenAsync(FileAccessMode.ReadWrite)Using outputStream AsStream = zipStream.AsStreamForWrite() outputStream.SetLength(0) stream.WriteTo(outputStream)Await outputStream.FlushAsync()EndUsingEndUsing Dim msgDialog As New MessageDialog("Do you want to view the document?", "File has been created successfully") Dim yesCmd As New UICommand("Yes") msgDialog.Commands.Add(yesCmd) Dim noCmd As New UICommand("No") msgDialog.Commands.Add(noCmd)WinRT.Interop.InitializeWithWindow.Initialize(msgDialog, windowHandle) Dim cmd AsIUICommand = Await msgDialog.ShowAsync() If cmd.Label = yesCmd.LabelThenAwaitWindows.System.Launcher.LaunchFileAsync(stFile) End If End If End Sub End ClassEndNamespace
Imports System
Imports System.Collections.Generic
Imports System.IO
Imports System.Runtime.InteropServices.WindowsRuntime
Imports Windows.Storage
Imports Windows.Storage.Pickers
Imports Windows.Storage.Streams
Imports Windows.UI.Popups

Namespace MAUI_IronXL
	Partial Public Class SaveService
		Public Async Sub SaveAndView(ByVal fileName As String, ByVal contentType As String, ByVal stream As MemoryStream)
			Dim stFile As StorageFile
			Dim extension As String = Path.GetExtension(fileName)
			Dim windowHandle As IntPtr = System.Diagnostics.Process.GetCurrentProcess().MainWindowHandle

			If Not Windows.Foundation.Metadata.ApiInformation.IsTypePresent("Windows.Phone.UI.Input.HardwareButtons") Then
				Dim savePicker As New FileSavePicker()
				savePicker.DefaultFileExtension = ".xlsx"
				savePicker.SuggestedFileName = fileName
				savePicker.FileTypeChoices.Add("XLSX", New List(Of String) From {".xlsx"})

				WinRT.Interop.InitializeWithWindow.Initialize(savePicker, windowHandle)
				stFile = Await savePicker.PickSaveFileAsync()
			Else
				Dim local As StorageFolder = ApplicationData.Current.LocalFolder
				stFile = Await local.CreateFileAsync(fileName, CreationCollisionOption.ReplaceExisting)
			End If

			If stFile IsNot Nothing Then
				Using zipStream As IRandomAccessStream = Await stFile.OpenAsync(FileAccessMode.ReadWrite)
					Using outputStream As Stream = zipStream.AsStreamForWrite()
						outputStream.SetLength(0)
						stream.WriteTo(outputStream)
						Await outputStream.FlushAsync()
					End Using
				End Using

				Dim msgDialog As New MessageDialog("Do you want to view the document?", "File has been created successfully")
				Dim yesCmd As New UICommand("Yes")
				msgDialog.Commands.Add(yesCmd)
				Dim noCmd As New UICommand("No")
				msgDialog.Commands.Add(noCmd)

				WinRT.Interop.InitializeWithWindow.Initialize(msgDialog, windowHandle)

				Dim cmd As IUICommand = Await msgDialog.ShowAsync()
				If cmd.Label = yesCmd.Label Then
					Await Windows.System.Launcher.LaunchFileAsync(stFile)
				End If
			End If
		End Sub
	End Class
End Namespace
Output
Build and run the MAUI project. On successful execution, a window will open showing the content depicted in the image below.
Figure 1 - Output
Clicking on the "Create Excel File" button will open a separate dialog window. This window prompts users to choose a location and a filename by which to save a new (generated) Excel file. Specify the location and filename as directed, and click OK. Afterward, another dialog window will appear.
Figure 2 - Create Excel Popup
Opening the Excel file as directed in the popup will bring up a document as shown in the screenshot below.
Figure 3 - Read and Modify Excel Popup
Clicking on the "Read and Modify Excel File" button will load the previously generated Excel file and modify it with the custom background and text colors that we defined in an earlier section.
Figure 4 - Excel Output
When you open the modified file, you'll see the following output with table of contents.
Figure 5 - Modified Excel Output
Conclusion
This explained how we can create, read and modify Excel files in the .NET MAUI application using the IronXL library. IronXL performs very well and does all operations with speed and accuracy. It is an excellent library for Excel operations, outperforming Microsoft Interop, as it doesn't require any installation of the Microsoft Office Suite on the machine. In addition, IronXL supports multiple operations like creating workbooks and worksheets, working with cell ranges, formatting, and exporting to various document types like CSV, TSV, and more.
IronXL supports all project templates like Windows Form, WPF, ASP.NET Core, and many others. Refer to our tutorials for creating Excel files and reading Excel files for additional information about how to use IronXL.
Quick Access Links
Explore this How-To Guide on GitHub
The source code for this project is available on GitHub.
Use this code as an easy way to get up and running in just a few minutes. The project is saved as a Microsoft Visual Studio 2022 project, but is compatible with any .NET IDE.
IronXL is a C# .NET library designed for reading, writing, and manipulating Excel files. It allows users to create, read, and modify Excel documents without requiring external frameworks or third-party software.
How do I install IronXL in my .NET MAUI project?
You can install IronXL in your .NET MAUI project using the NuGet Package Manager Console in Visual Studio. Simply open the console and enter the command to install the IronXL library.
Can IronXL be used for creating Excel files in .NET MAUI?
Yes, IronXL supports creating Excel files in .NET MAUI. You can generate Excel documents from scratch and customize their content, appearance, and metadata with IronXL's intuitive APIs.
Is it possible to read and modify Excel files using IronXL in .NET MAUI?
Absolutely. IronXL allows you to load, read, and modify existing Excel files. You can apply formulas, set styles, and format cells directly in your .NET MAUI application.
Does IronXL require Microsoft Office to be installed?
No, IronXL does not require Microsoft Office to be installed on the machine. It is a standalone library that performs excellently without relying on external applications.
Can I view Excel files in the browser using IronXL in .NET MAUI?
IronXL allows you to save and export Excel files that can be opened and viewed in a browser or standard Excel application, enabling seamless integration into web workflows.
What file formats does IronXL support?
IronXL supports a variety of document formats including XLSX and lets users export their worksheets to other formats like CSV and TSV.
What are the benefits of using IronXL over Microsoft Interop?
IronXL provides several advantages over Microsoft Interop, including faster performance, no dependency on the Office Suite, and the ability to handle a range of tasks such as worksheet creation, cell formatting, and file exporting efficiently.
Is IronXL compatible with different .NET project templates?
Yes, IronXL is compatible with various .NET project templates including Windows Forms, WPF, and ASP.NET Core, among others.
Where can I find additional resources and tutorials for using IronXL?
You can find additional tutorials and resources for using IronXL on the official [Iron Software website](https://ironsoftware.com) and their GitHub repository, which includes sample projects and API references.
Curtis Chau holds a Bachelor’s degree in Computer Science (Carleton University) and specializes in front-end development with expertise in Node.js, TypeScript, JavaScript, and React. Passionate about crafting intuitive and aesthetically pleasing user interfaces, Curtis enjoys working with modern frameworks and creating well-structured, visually appealing manuals.